Tuesday, January 31, 2012

Classic Lasagna

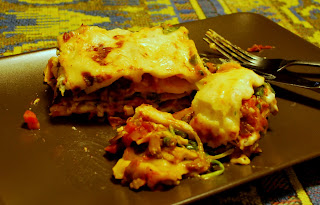
Who doesn't love a classic lasagna?  Rich, meaty, cheesy goodness -- it's seriously one of my favorite things to eat.  There's only one thing wrong with them, and if you've been reading this month's blog you'll know what it is -- they take so long to prepare!!!!  But this is the last dish I'm preparing (this month) from The Essential Eating Well Cookbook, and I thought a little effort was certainly deserved.

The book promised "An old-fashioned meat-and-cheese lasagna made lusciously low-fat."  Hmm...I've had low fat lasagnas, and they taste, um, well they taste like they're low fat lasagnas but nothing ventured nothing gained, right?  So a little over three hours later I pull the lasagna from the oven, and I am disappointingly underwhelmed. The pasta looked dry, the sauce sparse, and little sad spots of cheese lay across the top definitely made it look low fat, but luscious?  I was skeptical.  So we waited 10 minutes to let the casserole cool, and then we dug in.  It's really amazing how tasty this pasta was.  Truthfully, I prefer more sauce and cheese, but it was flavorful, cheesy, and delicious.  And the biggest surprise of all?  It had less fat and calories than the Lasagne al Forno I made earlier in the month!

As this is the last recipe of the month I suppose it's my last chance to make a confession.  I didn't always follow the recipes when it came to how much oil to use, and I didn't use low fat dairy items.  Listen -- here's my opinion on low fat anything:  Life is short -- use the real stuff!  Moderate the rich, fatty stuff, and enjoy it!  So eat your tuna packed in oil, use real butter, make your own Ranch Dressing with real buttermilk, etc., etc., just don't eat it every day!  Thanks, I feel better getting that off my chest.

Okay, so in this dish I used a tbsp of oil in the meat sauce instead of 1/2 tbsp (Hello!  Turkey sausage?  Didn't want it to stick), left out the sun-dried tomatoes (don't like them), used crimini mushrooms (such a rich meaty taste, and better texture than button), and skipped the nonfat and part-skim suggestions for the cheese.  Delicious!  This is definitely my new go-to lasagna recipe.

Classic Lasagna
The Essential Eating Well Cookbook
Serves 8

Meat Sauce:
1/2 tbsp extra-virgin olive oil
4 ounces hot or sweet Italian turkey sausage, casings removed
2 onions, finely chopped
1 carrot, finely chopped
12 ounces mushrooms, wiped clean and chopped
2 cloves garlic, minced
Salt & freshly ground pepper to taste
1/4 cup dry red wine
2 28-oz cans plum tomatoes, drained and chopped
1/2 cup sun-dried tomatoes (not packed in oil), slivered
1 tsp dried oregano
1 tsp dried basil
1 tsp dried thyme
1/ tsp crushed red pepper (or to taste)

Pasta & Cheese Filling:
12 lasagna noodles (12 ounces)
2 cups nonfat ricotta cheese
Salt & freshly ground pepper to taste
ground nutmeg to taste
1 cup grated part-skim mozzarella cheese
1/2 cup freshly grated Parmesan cheese
2 tbsp chopped fresh parsley

1.  To prepare meat sauce:  Heat oil in a large heavy pot or Dutch oven over medium-high heat.  Add sausage and cook, breaking up clumps, until browned, 3 to 5 minutes.  Reduce heat to medium.  Add onions and carrot; cook, stirring, until softened, 2 to 3 minutes.  Add mushrooms and garlic; season with salt and pepper.  Cook, stirring frequently, until mushroom liquid evaporates, 4 to 6 minutes.
2.  Stir in wine, plum tomatoes, sun-dried tomatoes, oregano, basic, thyme and crushed red pepper.  Bring to a simmer; reduce heat to low, cover and simmer, stirring occasionally, about 45 minutes.  Uncover and cook, stirring frequently, until the sauce is very thick, 30 to 45 minutes more.  Adjust seasoning with salt and pepper.
3.  To prepare filling & assemble lasagna:  Bring a large pot of lightly salted water to a boil.  Preheat oven to 350F.  Coat a 9x13 baking dish with cooking spray.
4.  Cook noodles until just tender, about 10 minutes.  Drain, then cool by plunging noodles into a large bowl of ice-cold water.  Lay noodles out on kitchen towels.
5.  Season ricotta with salt, pepper and nutmeg.  Spread about 1 1/2 cups meat sauce in prepared pan.  Layer 3 noodles on top.  Spread another 1 cup sauce over noodles.  Dot about 2/3 cup ricotta over sauce, then sprinkle with 1/4 cup mozzarella and 2 tbsp Parmesan.  Continue layering noodles, sauce and cheese, finishing with sauce, mozzarella and Parmesan.  Sprinkle with parsley; cover with foil.
6.  Bake the lasagna for 35 to 40 minutes, or until the sauce is bubbling.  Uncover and bake until golden, 5 to 10 minutes morel  Let cool for 10 minutes before cutting.

Per serving:  361 calories; 8g fat; 33mg cholesterol; 46g carbohydrate; 24g protein; 9g fiber; 367mg sodium.
Nutrition Bonus:  36% DV Fiber, 30% DV Calcium

Sunday, January 29, 2012

Vegetarian Enchiladas, and Black Bean & Barley

Sadly, my month of cooking from The Eating Well Cookbook is coming to a close and there are so many more recipes left to prepare!

Tonight we feasted on Vegetarian Enchiladas.  The recipe was pretty challenging to put together but it was well worth the effort.  It wasn't the most attractive dish but it was really delicious!  I served Black Beans & Barley with the enchiladas.  They were good but didn't really go with the enchiladas -- they'd probably work better with a chicken or meat entree.

Vegetarian Enchiladas
The Eating Well Cookbook
Serves 6

Corn Sauce:
2 cloves garlic, unpeeled
2 10-oz packages frozen corn
1 cup low-fat milk
1/8 tsp cayenne pepper
Salt and freshly ground pepper to taste

Enchiladas:
1 tsp canola oil
8 oz button mushrooms, wiped clean, stemmed and sliced
10 oz fresh spinach, stemmed and chopped
1 small onion, chopped
1/2 tsp salt
Freshly ground pepper to taste
12 corn tortillas
1 cup grated extra-sharp Cheddar cheese

1.  To prepare corn sauce:  Roast garlic in a large heavy skillet over medium-high heat, shaking the pan often, until lightly browned, about 8 minutes.  Add half the corn and cook, stirring often, until lightly toasted, about 8 minutes.


Reserve the garlic; transfer the corn to a blender.  Toast the remaining corn.  Place all but 1/2 cup of the corn in the blender.  Peel garlic and add to blender along with milk and cayenne.  Blend until smooth.  Strain through a fine sieve into a bowl.  Stir in reserved corn.  Season with salt and pepper.  Set aside.
2.  To prepare enchiladas:  Preheat oven to 350F.  Coat a 9x13 inch or similar baking dish with cooking spray.
3.  Heat oil in a large nonstick skillet over medium-high heat.  Add mushrooms and cook, stirring often, until softened, about 4 minutes.  Add spinach and cook until wilted, about 2 minutes.  Drain off excess liquid.  Remove from heat and stir in onion, salt and pepper.
4.  Toast tortillas.
5.  Sprinkle a generous tablespoon of cheese down the center o a tortilla.  Cover the cheese with a scant 1/4 cup of the spinach mixture.  Fold one side of the tortilla over the filling, then roll up tightly.  Place the enchilada seam-side down in the prepared dish.  Repeat with the remaining tortillas, cheese and spinach mixture.  Spoon corn sauce over the enchiladas, covering completely.
6.  Cover baking dish with foil.  Bake for 25 minutes, or until heated through.  Uncover and bake for 5 minutes more.

Per serving:  381 calories; 14g fat; 24mg cholesterol; 58g carbohydrate; 16g protein; 9g fiber; 418 sodium.
Nutrition Bonus:  100% DV Vitamin A, 36% DV fiber, 35% DV Vitamin C; 34% DV Folate;  31% Potassium, 30% DV Calcium.


Black Beans & Barley
The Eating Well Cookbook
Serves 4, 1 cup each

2 tsp canola oil
1 medium onion, chopped
1/2 red bell pepper, chopped
2 cloves garlic, minced
1/4 tsp ground cumin
1 1/2 cups reduced sodium chicken broth or vegetable broth
3/4 cup quick-cooking barley
1/2 tsp dried oregano
1 15-1/2 oz can black beans, rinsed
2 tbsp chopped fresh cilantro

1.  Heat oil in a large nonstick skillet over medium heat.  Add onion, bell pepper and garlic; cook, stirring frequently, until onion is barely tender, about 5 minutes.  Add cumin and cook for 30 seconds more.
2.  Add broth, barely and oregano; increase heat and bring to a boil.  Reduce heat to low; cover and simmer until the barley is tender and most of the liquid has been absorbed, about 10 minutes.
3.  Gently stir in beans and heat through.  Sprinkle with cilantro just before serving.

Per serving:  279 calories; 4g fat; 1mg cholesterol; 49g carbohydrate; 12g protein; 13g fiber; 384mg sodium. 
Nutrition Bonus:  51% DV Fiber, 50% DV Vitamin C; 20% DV Iron. 

Thursday, January 26, 2012

Curried Chicken with Sweet Potatoes & Cauliflower

I hadn't cooked for a few days (wasn't feeling well) so I decided to make it up to the boys with something really special: Curried Chicken with Sweet Potatoes & Cauliflower.  I have to admit that I am not a big fan of curry -- or I should say I'm not a fan of the sauce that smothers and overwhelms the dish, but there was none of that with this recipe.  The marinade infused everything with lots of yummy curry flavor that was so delicious and I could taste all the other ingredients too!  My favorite part of the dish was the roasted sweet potato that had been tossed in a bit of reserved marinade -- sweet, spicy, and so good!

This recipe was super simple to follow -- the hardest part was for me to remember to prepare the chicken that morning to give the marinade plenty of time to work it's magic.  I was a little absent minded when planning this dish and bought sour cream instead of yogurt, and I defrosted chicken breasts instead of chicken thighs (I just cut the breasts in half so they approximated the size of a chicken thigh).  I followed their hint (listed below) and soaked the cauliflower for 10 to 15 minutes before roasted, and it really helped keep it from drying out.

A little Jasmine rice on this side, and we had ourselves one fantastic feast!

Curried Chicken with Sweet Potatoes & Cauliflower
The Essential Eating Well Cookbook
Serves 4

3/4 cup nonfat plain yogurt
1 tsp madras-style curry powder
1 tsp ground coriander
1 tsp ground ginger
1 clove garlic, minced
3/4 tsp salt, divided
1/4 tsp cayenne pepper
8 boneless, skinless chicken thighs (about 1 1/2 lb)
1 sweet potato (about 1 lb) peeled and cut into 1/2 inch cubes
3 cups cauliflower florets (1 small head)
1 tbsp extra-virgin olive oil
Freshly ground pepper to taste
1/4 cup chopped unsalted dry-roasted peanuts or cashews
1/4 cup loosely packed cilantro leaves

1.  Combine yogurt, curry powder, coriander, ginger, garlic, 1/2 tsp salt and cayenne in a shallow glass dish; mix to blend.  Reserve 1/4 cup of this mixture; cover and refrigerate.  Add chicken to the remaining yogurt mixture and turn to coat.  Cover and marinate in the refrigerator for at least 4 hours or overnight.
2.  Preheat oven to 450F.  Use a large baking sheet with sides and lightly coat it with cooking spray.
3.  Remove the chicken from the marinade and place on the prepared baking sheet.  Toss sweet potato with the reserved yogurt mixture in a medium bowl and place on the baking sheet.  Toss cauliflower with oil in a medium bowl and add to the baking sheet.  Season vegetables with the remaining 1/4 tsp salt and pepper.  Roast chicken and vegetables, uncovered, for 15 minutes.
4.  Carefully turn the chicken over and stir the vegetables.  Roast until the vegetables are tender and chicken is cooked through, 10 to 15 more minutes more.
5.  Arrange chicken and vegetables on a platter or individual plates and garnish with peanuts (or cashews) and cilantro.

Hints:  Soaking the prepared vegetables in ice water for 15 minutes before roasting will hydrate them, making the more moist and tender when cooked.  To substitute bone-in thighs, pull off the skin and roast chicken 10 minutes.

Per Serving:  473 calories; 14g fat; 121mg cholesterol; 34g carbohydrates; 53g protein; 8g fiber; 478mg sodium.
Nutrition Bonus: 30% DV fiber; 440% DV Vitamin A; 110% DV Vitamin C; 20% DV Iron; 2% DV Folate

Thursday, January 19, 2012

Stuffed Chicken Breasts (sort of)

We forgot to take pictures -- that's how good this recipe was!  The recipe gives you three options for the filling, and I chose Goat Cheese-Olive Filling.  The preparation was easy, and the chicken is really delicious -- not especially pretty -- but really delicious!

I did make a couple substitutions.  First substitution:  Yesterday I pulled what I thought were two packages of boneless chicken breasts out to defrost, but in reality was one package of boneless chicken breasts and one package of boneless chicken thighs so I decided not to "stuff" the chicken.  I guess I could have put the cheese in the middle of the thighs and then rolled them up but I just didn't feel like it.  The cheese was served as a condiment to the chicken (I spread it on top of my chicken) and it was really delicious!  Second substitution:  I used chopped green olives instead of black -- loved it!

Stuffed Chicken Breasts
The Essential Eating Well Cookbook
Serves 4

4 boneless, skinless chicken breast halves (1 to 1 3/4 lbs total)
1 egg white
1/2 cup plain dry breadcrumbs
2 tsp extra-virgin olive oil

Goat Cheese-Olive Filling:
2 tbsp creamy goat cheese
1 tbsp chopped black olives
Freshly ground pepper to taste
Blend in a small bowl with a fork


1.  Preheat oven to 400F.  Use a baking sheet with sides and lightly coat with cooking spray.
2.  Prepare the filling of your choice.
3.  Cut a horizontal slit along the thin, long edge of a chicken breast half, nearly through to the opposite side.  Open up each breast and place 1/4 of the filling int he center.  Close the breast over the filling, pressing the edges firmly together to seal.  Repeat with the remaining chicken breasts and filling.
4.  Lightly beat egg white with a fork in a medium bowl.  Place breadcrumbs in a shallow glass dish.  Hold each chicken breast half together and dip in egg white, then dredge in breadcrumbs.  (Discard leftovers.)
5.  Heat oil in a large nonstick skillet over medium-high heat.  Add chicken breasts; cook until browned on one side, about 2 minutes.  Place the chicken, browned-side up, on the prepared baking sheet.  Bake until the chicken is not longer pink in the center or until an instant-read thermometer registered 170F, about 20 minutes.

Per Serving:  235 calories; 7g fat; 72mg cholesterol; 10g carbohydrate; 31g protein; 1g fiber; 248mg sodium

Wednesday, January 18, 2012

Multi-Grain Waffles

Last night about 6" of snow fell on Tacoma.  I was happy and relieved that my husband decided to work from home.  To celebrate I made pancakes!  My husband loves anything multi-grain, and lucky for me...there was a recipe in The Essential Eating Well Cookbook!

This recipe rocks.  Delicious, filling, and easy to prepare -- I love these pancakes.

Multi-Grain Pancakes
The Essential Eating Well Cookbook
Makes 8 servings (2 pancakes each)

2 cups buttermilk
1/2 cup old-fashioned rolled oats
2/3 cup whole-wheat flour
2/3 cup all-purpose flour
1/4 cup toasted wheat germ or cornmeal
1 1/2 tsp baking powder
1/2 tsp baking soda
1/4 tsp salt
1 tsp ground cinnamon
2 large eggs, lightly beaten
1/4 cup packed brown sugar
1 tbsp canola oil
2 tsp vanilla extract

1.  Mix buttermilk and oats in a medium bowl; let stand for 15 minutes.
2  Whisk whole-wheat flour, all-purpose flour, wheat germ (or cornmeal), baking powder, baking soda, salt and cinnamon in a large bowl.
3.  Stir eggs, sugar, oil and vanilla into the oat mixture.  Add the wet ingredients to the dry ingredients; mix with a rubber spatula just until moistened.
4.  Coat a large nonstick skillet with cooking spray; heat over medium heat.  Using about 1/4 cup batter for each pancake, cook until the bottoms are golden and small bubbles start to form on the tops, about 3 minutes.  Flip and cook until pancakes are browned and cooked through, 1 to 2 minutes longer.

Per Serving: 188 calories; 4g fat; 55 mg cholesterol; 30g carbohydrate; 8g protein; 3g fiber; 328mg sodium
Nutrition Bonus: 14% DV calcium

Updated Mac & Cheese

Who doesn't love macaroni and cheese?  Rich, creamy, cheesy...yum!  My go-to recipe is one I've adapted over the years through trial and error but I'm still not 100% happy with it so I'm always happy to try new recipes.

The results on this recipe are mixed -- meaning the boys liked it (note they said "like" not "love") and they thought it was good (but not great), and I didn't like it mainly because of the spinach and cottage cheese.  This was the first time I used spinach in a mac n cheese dish, and I thought the cottage cheese gave the dish a sour taste that I did not enjoy.

The dish was easy to prepare but I don't think I'll make it again -- there are plenty of other mac n cheese recipes out there to try.

Updated Mac & Cheese
The Essential Eating Well Cookbook
Makes 4 servings

3 tbsp plain dry breadcrumbs
1 tsp extra-virgin olive oil
1/4 tsp paprika
1 16 oz or 10 oz package frozen spinach
1 3/4 cups 1% milk, divided
3 tbsp all-purpose flour
2 cups grated extra-sharp cheddar cheese (6 oz)
1 cup low-fat (1%) cottage cheese
1/8 tsp ground nutmeg
1/2 tsp salt, or to taste
Freshly ground pepper to taste
 8 oz (2 cups) whole-wheat elbow macaroni or penne

1.  Put a large pot of lightly salted water on to boil.  Preheat oven to 450F.  Coat an 8" square (2 quart) baking dish with cooking spray.
2.  Mix breadcrumbs, oil and paprika in a small bowl; set aside.  Cook spinach according to package directions.  Drain and refresh under cold water; press out excess moisture.  Set aside.
3.  Heat 1 1/2 cups milk in a large heavy saucepan over medium-high heat until steaming.  Whisk remaining 1/4 cup milk and flour in a small bowl until smooth; add to the hot milk and cook, whisking constantly, until the sauce simmers and thickens, 2 to 3 minutes.  Remove from heat and stir in cheddar until melted.  Stir in cottage cheese, nutmeg, salt and pepper.
4.  Cook pasta for 4 minutes, or until not quite tender.  (It will continue to cook during baking.)  Drain and add to the cheese sauce; mix well.  Spread half the pasta mixture in the prepared baking dish.  Spoon spinach on top.  Top with the remaining pasta; sprinkle with the breadcrumb mixture.
5.  Bake the casserole until bubbly and golden, 25 to 30 minutes.


Per Serving: 503 calories; 17g fat; 54mg cholesterol; 60g carbohydrate; 31g protein; 8g fiber; 935 mg sodium
Nutrition Bonus: 200% DV Vitamin A, 60% DV Calcium, 27% DV Folate

Tuesday, January 17, 2012

Lasagne al Forno

I love lasagna.  I just don't like to make it -- it really takes a long time to prepare and I am a lazy cook.  This recipe, however, was so delicious it was certainly worth the effort.

Now this may get to be a bit of a bitch-fest, but I have to admit I had a few problems with this recipe. The recipe calls for 8 cups of spinach but I couldn't fit it all in the casserole.  In fact I don't think I even used half that amount.  I had assumed I would have to cook the spinach before layering in the casserole but I read the directions three times and saw no mention about cooking the spinach.  Maybe it's a typo.  Next time I'll try cooking the spinach first before layering in the lasagna.   And how many baking dishes am I supposed to have?  The recipe calls for an 8x11 baking dish!  8x11!  I have a 8x8, 7x9, 11x13, 13x17, but have never even seen an 8x11!  I used my 7x9 pan -- worked fine.  Now I am not a fast chopper, and it probably took me a half hour just to prep the veggies (there are a lot!), and with the cooking time for the sauce I think it was almost two hours before I could put the lasagna in the oven and sit down for a rest.  Whew!  I was tired!  The only substitution I had to make was 2 tbsp of tomato paste for the sun-dried tomatoes.  

Makes 6 servings 

Mushroom Sauce
1 1/2 tbsp extra virgin olive oil, divided
1 onion, finely chopped
1 carrot, finely chopped
1 stalk celery, finely chopped
12 ounces mushrooms, wiped clean and chopped (4 cups)
2 cloves garlic, finely chopped
1/2 cup dry white wine
1 28-ounce can diced tomatoes
2 sun-dried tomatoes (not packed in oil), very finely chopped (2 tbsp)
1 tsp dried thyme leaves
Salt and fresh ground pepper to taste

White Sauce
1/3 cup all-purpose flour
3 cups 1% milk
1/4 tsp freshly grated nutmeg

1 pound no-boil lasagna noodles
8 cups spinach leaves
1 cup freshly grated Parmesan cheese (2 ounces), divided. 

1. To prepare the mushroom sauce:   Heat 1/2 tbsp oil in a Dutch oven over medium heat.  Add onion, carrot and celery; cook, stirring, until the onion has softened, about 5 minutes.  Add mushrooms and garlic; cook until the mushrooms release their liquid, 2 to 3 minutes.  Add wine; cook until most of the liquid has evaporated, about 5 minutes. 
2.  Stir in diced tomatoes, sun-dried tomatoes and thyme; bring to a simmer.  Reduce heat to low and simmer, stirring often, until the sauce is thick, about 1 hour.  Season with salt and pepper. 
3.  To prepare white sauce:  Heat the remaining 1 tbsp oil in a heavy saucepan over low heat.  Add flour and cook, whisking constantly, until the flour starts to turn light brown, about 3 minutes.  remove from the heat and cook, whisking constantly, until the sauce bubbles and thickens.  Season with nutmeg and salt to taste. 
4.  To assemble & bake lasagna:  Preheat oven to 375F.  Coat an 8z11 1/2 inch baking dish with cooking spray. 

5.  Spread 1/2 cup of the mushroom sauce in the prepared pan, arrange a layer of noodles on top and spread with another 1/2 cup of the mushroom sauce.  Arrange a layer of spinach over the sauce and drizzle with 1/3 cup of the white sauce.  Sprinkle 2 tbsp Parmesan over the spinach and top with another layer of noodles.  Repeat this layering five more times.  Spread the remaining white sauce over the top layer of noodles, covering completely.  Cover with foil. 

 6.  Bake the lasagna for 30 minutes.  Uncover, sprinkle with the remaining Parmesan, and bake until golden, about 20 minutes longer.  Let rest for 10 minutes before serving.

Per serving:  510 calories; 12g fat; 19mg cholesterol; 76 carbohydrate; 29g protein; 17g fiber; 413mg sodium.  
Nutrition Bonus:  130% DV vitamin A, 66% DV fiber, 42% DV Folate, 40% DV calcium, 40% DV Iron

Vietnamese Grilled Chicken

My husband likes to barbecue so one Father's Day I bought him an electric barbecue grill thinking he would like to use it during the winter months -- he didn't.  I really like the grill and am happy for any excuse to pull it out of storage so I was tickled to see a recipe for Vietnamese Grilled Chicken in The Essential Eating Well Cookbook.

I love Vietnamese food -- sweet, salty, spicy -- so yummy (probably why I love Thai food too).  This recipe is delicious!  The family loved it!  Unfortunately I couldn't find any papaya so I didn't make the relish.  I served the chicken with jasmine rice, and a pineapple salad using the relish recipe minus the garlic (and of course the papaya).  And I substituted the chicken leg with chicken thighs -- pretty sure nobody minded.

Vietnamese Grilled Chicken
The Essential Eating Well Cookbook
Yield:  4 servings

1/4 cup lime juice (2limes)
2 1/2 tbsp fish sauce
4 cloves garlic, minced
2 Serrano or jalapeno peppers, seeded and minced
2 tbsp sugar
1 tbsp canola oil
4 bone-in chicken legs (about 2 1/2 pounds total) skim and fat removed, cut in half through the joint
1 1/2 cups Papaya Relish (recipe follows)

1.  Whisk lime juice, fish sauce, garlic, peppers, sugar and oil in a small bowl.  Pour about half of this marinade into a shallow glass dish and reserve the remainder for basting.  Add chicken pieces to the dish and turn to coat.  Cover and marinate in the refrigerator for 20 minutes to 1 hour, turning occasionally.
2.  Meanwhile, make Papaya Relish.  Preheat grill to medium-high.
3.  Oil the grill rack.  Grill the chicken, covered, turning several times and basting the browned sides with the reserved marinade, until well browned but not charred, and no longer pink inside, 20 to 30 minutes.  Serve with Papaya Relish.

Per serving:  253 calories; 9g fat; 89mg cholesterol; 15g carbohydrate; 27g protein; 1g fiber, 606 mg sodium.

Papaya Relish
Yield approximately 1 1/2 cups

2 cloves garlic, crushed and peeled
1/2 tsp kosher salt
3 tbsp rice-wine vinegar
2 tsp sugar
2 tsp hot sauce such as sambal olek or Tabasco
1 firm papaya, peeled, seeded and diced (1 1/2 cups)
1/2 cup finely diced red onion
1/4 cup chopped fresh cilantro

With the side of a chef's knife, mash garlic with salt.  Transfer to a small bowl and whisk in vinegar, sugar and hot sauce.  Add papaya, onion and cilantro; toss gently to mix.   Best served shortly after it is prepared.

Per 1/3 cup serving:  43 calories; 0g fat; 0mg cholesterol; 11g carbohydrate; 1g protein; 1g fiber; 254mg sodium.

Back on Track


The last couple of months have been crazy -- holidays, family, parties, birthdays -- it's been a whirlwind of activity, but the new year has begun, and it's time to get back on track!  I have so many cookbooks that sometimes it's hard to plan what to make, so I've decided to pick a different cookbook each month to cook exclusively out of.

Since it's January, and people like to make New Year's Resolutions that usually have something to do with health and weight loss I've picked The Essential Eating Well Cookbook to use for meal planning.  It's a great cookbook with lots of delicious recipes that have low fats, good carbs, and lots of vegetables -- kind of like the South Beach diet.  I think this is the first time I've prepared any of the recipes out of this book so I'm pretty excited to taste the results.

I hope you enjoy it too.

Saturday, January 7, 2012

Happy Birthday to Paul!

Paul took a vacation week after New Year's Day so he could relax during his birthday.  His kids had all assembled in Seattle so we spent the day with them on Monday, and then Tuesday left for Portland for two days where his daughter's generously let us invade their apartment.  It was great to spend a couple days with the girls, and we enjoyed all the wonderful restaurants, breweries, and coffee shops that Portland is known for -- but it was really nice to come home and eat some home-cooked meals.

I asked Paul what he wanted for his birthday meal, and as usual he said whatever I made would be fine with him.  The other day I saw the browser on the computer had been left open on a beef pot roast recipe...hmm...I can take a hint -- beef pot roast it is!  

Now I'm not ashamed to admit I need to look at a recipe for pot roast since it's a dish I prepare maybe once every other year.  I found a delicious, classic recipe online at here at my recipes.com, but I made a couple of modifications:  I used 6 medium sized garlic cloves instead of 3, and I used smallish red potatoes instead of the Yukon gold.  Having learned from years past that potatoes tend to disintegrate into the sauce I simply cut the potatoes in half lengthwise, and they were nice, chunky, cooked, and intact for the meal.  

I sauteed some mushrooms and green beans for side dishes, and found an excellent cake/frosting recipe from Smitten Kitchen.  


I think Paul was pleased with his birthday dinner!